Alright! Time for the final post in this series of GREP techniques! What I've done is created a graphic inside of InDesign using various tools. The end result is a vector-based element and I've highlighted it using the Direct Selection tool so you can see the points on the path that make up the shape.
Although I created this within InDesign, it could just as easily be a placed vector graphic from Illustrator or even an image from Photoshop. This method will work regardless of what type of graphic you are using.
Next you'll need to click on the graphic with your Selection Tool (black arrow) and choose Edit>Copy. Now switch to your Type Tool and click in an area of text where you'd like the graphic to appear and choose Edit>Paste. You've just created an in-line graphic which is a graphic that acts like a piece of text within InDesign. What we're doing here is setting up one instance of the graphic the way we'd like it to appear in all of our frames and then we'll automate it using GREP.

The main advantage of an in-line graphic is that it will behave like a character of text and therefore will flow with the text whenever an edit is made anywhere within the text that could affect the in-line graphic. (whew!).
At this point you could simply run the GREP search as you did in the previous post because it is actually pasting the contents of the clipboard in the change to: field. That being said, I can never leave well enough alone so I'm going to take it one step further. I'm going to precisely adjust the position of that graphic by making it an anchored object.
Click on the in-line graphic with the Selection tool and choose Object>Anchored Object>Options from the menu at the top of your screen. In the Anchored Object Options dialog box, set the Position to Custom, set the X relative to anchor marker and the Y relative to baseline, and turn the Preview checkbox on and click OK.
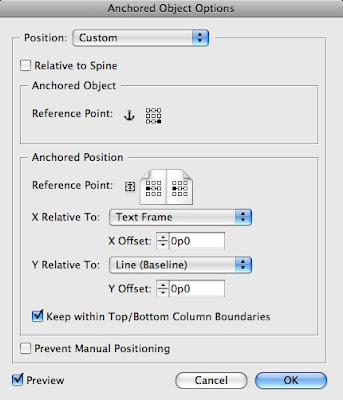
Now, if you haven't worked with Anchored Objects before, this dialog box can seem a bit daunting (leave comments if you'd like this to be a future blog topic) but we're going to simplify it. After you clicked OK, your graphic probably jumped away from where you originally pasted it which is fine. Using your Selection tool simply drag the graphic back to where it was and position it the way you would like it to appear with your text. Now go back to Object>Anchored Object>Options and check the "Prevent Manual Positioning" checkbox and click OK. This prevents anyone from being able to drag the graphic manually once you've positioned it.
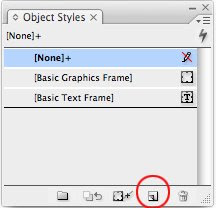
We're almost done here so stay with me! We want all of the end-it graphics to appear in the same position relative to the end of the text so with that graphic still selected with your Selection tool, go to your Object Styles panel and Alt/Option+click on the Create new style button at the bottom of the Object Styles panel. Call the style end-it, Click the "Apply Style to selection" checkbox and click OK. An object style will apply the positioning that was applied to the end-it graphic to any other graphic that you apply it to. VERY IMPORTANT! Click on the end-it graphic and you're end-it Object Style should be highlighted in the Object Styles panel. CHOOSE EDIT>COPY. This will copy the graphic with the Object style applied to the clipboard.
Now, let's jump back into the Find/Change dialog box and click on the GREP tab. We're literally going to run the exact same GREP search that we did in part 2! Because the graphic with the Object Style has been copied to the clipboard, the Change to: portion of the GREP search should also apply the formatting to the replaced character. Run the GREP search on the Document (not just the story) and your end-it character should appear at the end of every story! Now, if you don't want the end-it character to appear after every single story in your document, the trick is to apply Paragraph styles to your text. In the example document that I've been using, I created several Paragraph Styles for the captions, body, and headings. What this allows me to do is indicate which stories of text to apply the end-it character to. Click on the More Options button within the Find/Change dialog box and in the Find Format: Section, click on the "Specify Attributes to Find" button and then choose the Paragraph style that you want to restrict your search to. Click OK. Then click change all. You should now have an end-it character at the end of only the stories for which the appropriate Paragraph Style is applied!
Monday, March 17, 2008
Thursday, March 13, 2008
Get a GREP! Part 2
In my previous post you saw how easy it is to use GREP to put a character at the end of a story. Something like this would require a significant amount of time in the past and would also open up the potential for human error.
One problem with the method used in part one was the fact that the end-it character was entered into every single story within your document including captions and headlines. Probably not what you would want. One solution is to select only the frames on your page and then in the Find/Change dialog box, set the Search to Stories. This would put the character only inside of the frames that were selected. Useful for a single page but not in a longer document which would require you to select every frame on each page. Not to mention that you can't select items across pages in InDesign!
A much more robust solution involves the use of Paragraph Styles in your document. When I set up this document, I created several paragraph styles to apply formatting to the text. As you can see, I've created a Body, Caption, and Heading style.
Now, following the same steps as in part 1, go into the Find/Change dialog box and set everything as before. This time however, click on the More Options button in the upper-right corner of the dialog box to display additional options. If you see the Fewer Options button, you're already where you need to be. Click on the "Specify attributes to find" button in the Find Format section of the dialog box and in the Find Format Settings dialog box, choose Body or the style in which you want the end-it mark to appear. Click OK then click the Change All button. Voila! All of your end-it marks should appear in only the stories that contain that style. Sweet!
The Specify attributes to change button.
Keep checking back! In part 3 we'll perform this operation with an in-line graphic which is useful when the end-it mark isn't a font but an actual graphic that needs to be placed at the end of every article.
Wednesday, March 12, 2008
Get a GREP!
Hi everyone, once again I apologize for taking so long to post another entry in here. Apologies aside, a few days ago Rob had a student e-mail a question about a way to add a character or image element to the end of every article in a document sometimes called a slug or end-it. Fortunately I have been spending a decent amount of time using GREP lately and with the help of renowned designer/trainer Michael Murphy, and a neat little video by David Blatner have figured out a solution to the problem!
First of all, what is GREP? Well, GREP stands for General Regular Expression Print. That's on the quiz by the way! Regardless of what it stands for, GREP is a pattern matching utility new in InDesign CS3 that allows you to perform complex find/change queries on text in your document that would have taken many many steps in previous versions and in other programs. GREP has been around for literally decades in the UNIX world and now creative professionals can make great use of this tool as well.
I'm going to begin with a basic InDesign document to demonstrate but this can work very easily in an entire document.
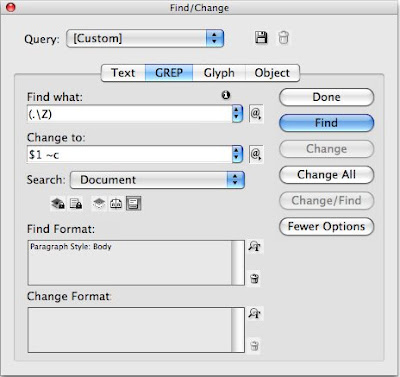
What I've done is created a basic page with a few stories to demonstrate. The first thing you need to do is go to Edit>Find/Change in InDesign to bring up the Find/Change window and click on the GREP tab at the top of the window. Now I looked high and low under the "Special Characters for Search" section to the right of the Find What field and couldn't find anything that allowed me to search the end of every story. However the regular expression that does this is .\Z. So in the Find What field, type (.\Z) - this is a capital Z and you need to include the parentheses. The parentheses will help us later on. After typing that text in the Find What field, click the find button several times and you'll see that you're cursor highlights the last character of every story in your document. Pretty cool!
Now, in the change to field you want to enter $1 and then the character that you'd like to insert at the end of each article. An easy way to do this is to set your character in a separate text frame to the size and font that you want to use. Then copy it to the clipboard. Now in the Change to: Field type $1 then click on the @ symbol to the right of the Change to field and choose Other>Clipboard Contents formatted. So you're Find/Change window should look like this:
The $1 basically takes what is in parentheses (the last character of your story) in the Find field and regurgitates it in the change so that you don't actually replace the found text. Click the change all button and you'll see that your character has been added to the end of every article in your document! If need be you can put a space after the $1 in the Change to: field so that a space is added in between the end of the story and the custom character.
That's all I have time for today, but tune back to see how you can do this with an in-line graphic and also how to contain the replacement to only certain stories in your text. Please post your comments we'd love to hear from you!
Subscribe to:
Posts (Atom)